Start here: first loginShuruaat: pehla login
Follow these sections in order the first time. It takes about 30 minutes to set up a whole pharmacy.Pehli baar yeh sections order mein follow karein. Poori pharmacy set up karne mein lagbhag 30 minute lagte hain.
Log inLogin karein
Open the Login page, enter your Pharmacy Code (like PH0001), your email and password. All three were sent to you when you bought the plan.Login page kholein aur apna Pharmacy Code (jaise PH0001), email aur password daalein. Yeh teeno plan lene ke baad aapko bheje gaye the.
Your set-up checklistSet-up ka checklist
1) Pharmacy profile → 2) Suppliers → 3) Medicines → 4) Add stock (purchase) → 5) First bill → 6) Bill design & signature. Each is explained below with screenshots. Red numbered boxes show exactly where to click.1) Pharmacy profile → 2) Suppliers → 3) Medicines → 4) Stock add karna (purchase) → 5) Pehla bill → 6) Bill design aur signature. Har step neeche screenshot ke saath samjhaya hai. Laal numbered box batate hain ki kahan click karna hai.
Step 1 · Pharmacy profileStep 1 · Pharmacy profile
Your name, logo, licence, UPI and bank details appear on every bill. Go to Settings → Pharmacy Profile.Aapka naam, logo, licence, UPI aur bank details har bill par aate hain. Settings → Pharmacy Profile par jayein.
Name, menu heading and logoNaam, menu heading aur logo
Write your pharmacy name, then upload a logo. The menu heading is optional: it changes the name shown at the top-left of the menu.Pharmacy ka naam likhein aur logo upload karein. Menu heading optional hai: isse menu ke upar-left mein dikhne wala naam badal jaata hai.
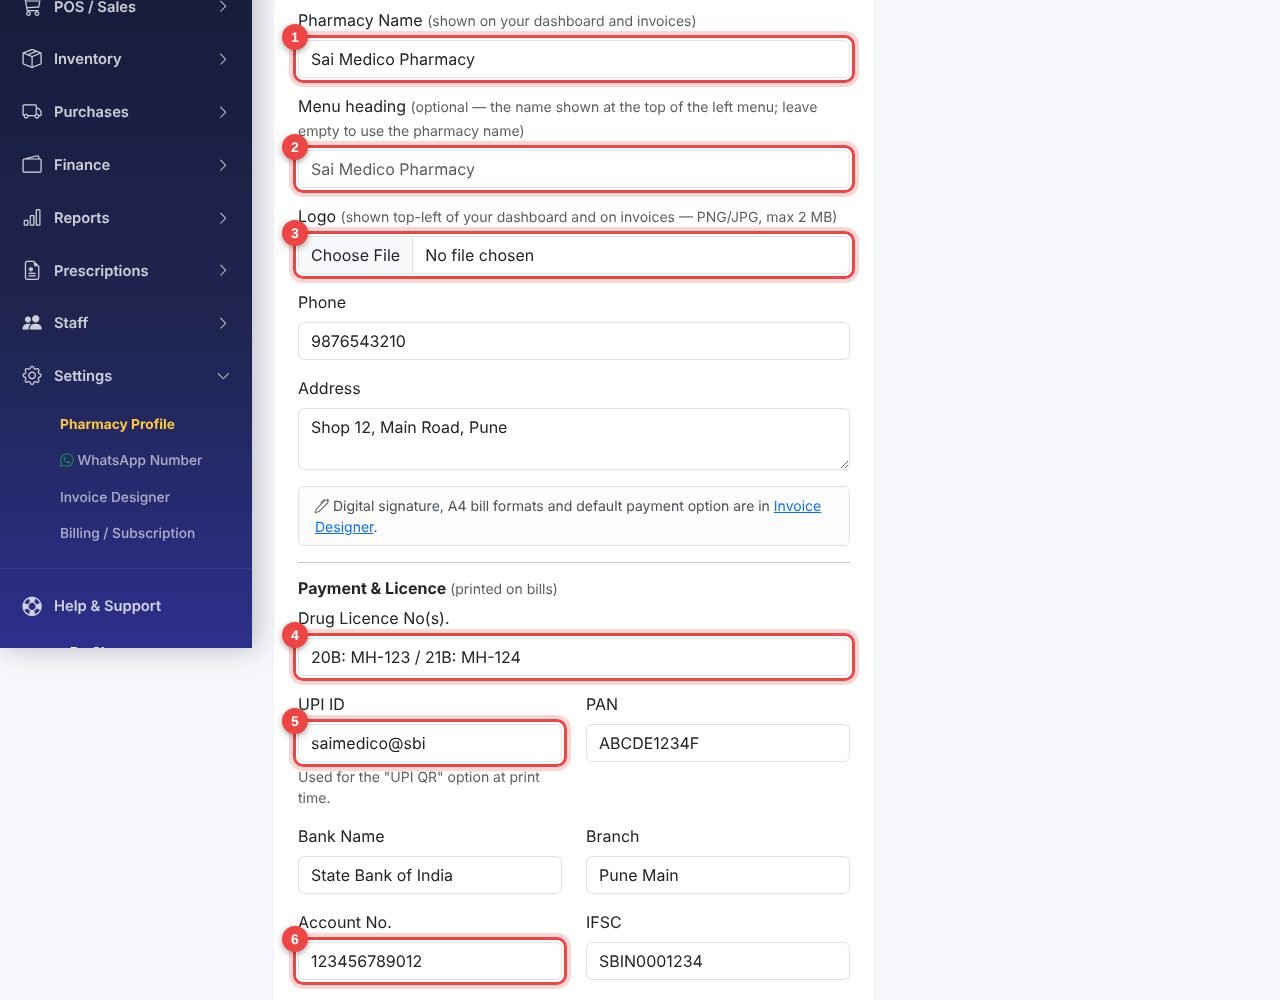
- 1Pharmacy name (printed on bills)Pharmacy ka naam (bill par chhapta hai)
- 2Menu heading — type any name you like for the top of the menuMenu heading — menu ke upar jo naam chahein wo likhein
- 3Upload your logo (PNG/JPG, max 2 MB)Apna logo upload karein (PNG/JPG, max 2 MB)
- 4Drug Licence numbers (20B / 21B)Drug Licence number (20B / 21B)
- 5UPI ID — used for the UPI QR on billsUPI ID — bill par UPI QR ke liye
- 6Bank account (and IFSC next to it) — printed on wholesale billsBank account (aur uske saath IFSC) — wholesale bill par chhapta hai
GST detailsGST details
Scroll down and enter your GSTIN and State Code (for example 27 for Maharashtra). The state code decides CGST+SGST or IGST on every bill. Click Save Settings.Neeche scroll karke GSTIN aur State Code daalein (jaise Maharashtra ke liye 27). State code se tay hota hai ki bill par CGST+SGST lagega ya IGST. Phir Save Settings dabayein.
Step 2 · Add suppliersStep 2 · Supplier jodein
Suppliers are the companies and distributors you buy from. Add them once, then pick them while entering purchases.Supplier woh company/distributor hain jinse aap maal kharidte hain. Ek baar add karein, phir purchase entry mein select kar lein.
Open SuppliersSuppliers kholein
Go to Purchases → Suppliers and click Add Supplier.Purchases → Suppliers par jayein aur Add Supplier dabayein.
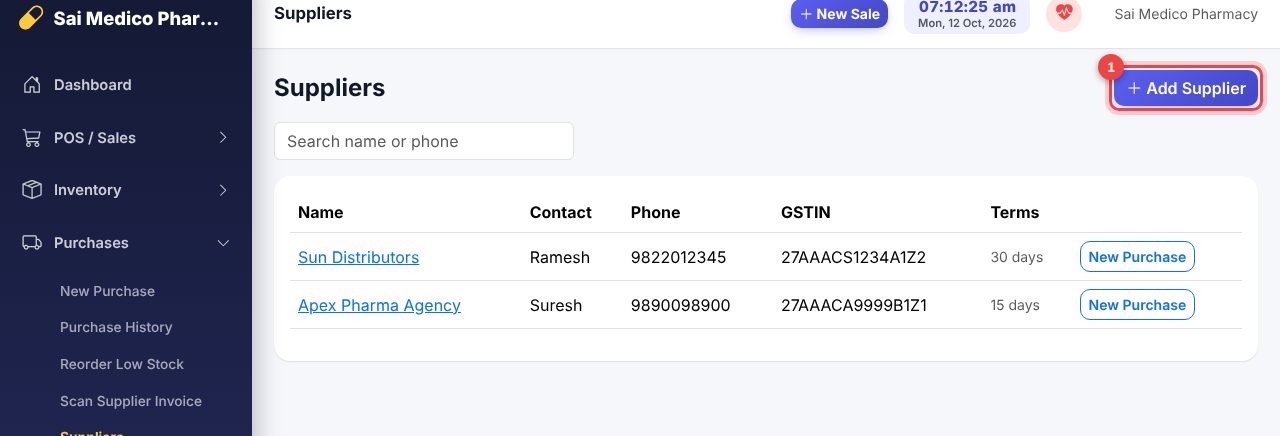
- 1Add Supplier buttonAdd Supplier button
Fill the supplier formSupplier form bharein
Enter the company name and GSTIN (the first two digits tell the app whether the purchase is local or inter-state). Add payment terms, such as 30 days, so you can track dues.Company ka naam aur GSTIN daalein (shuru ke do digit se app samajhta hai ki purchase local hai ya inter-state). Payment terms (jaise 30 days) daalein taaki dues track ho sakein.
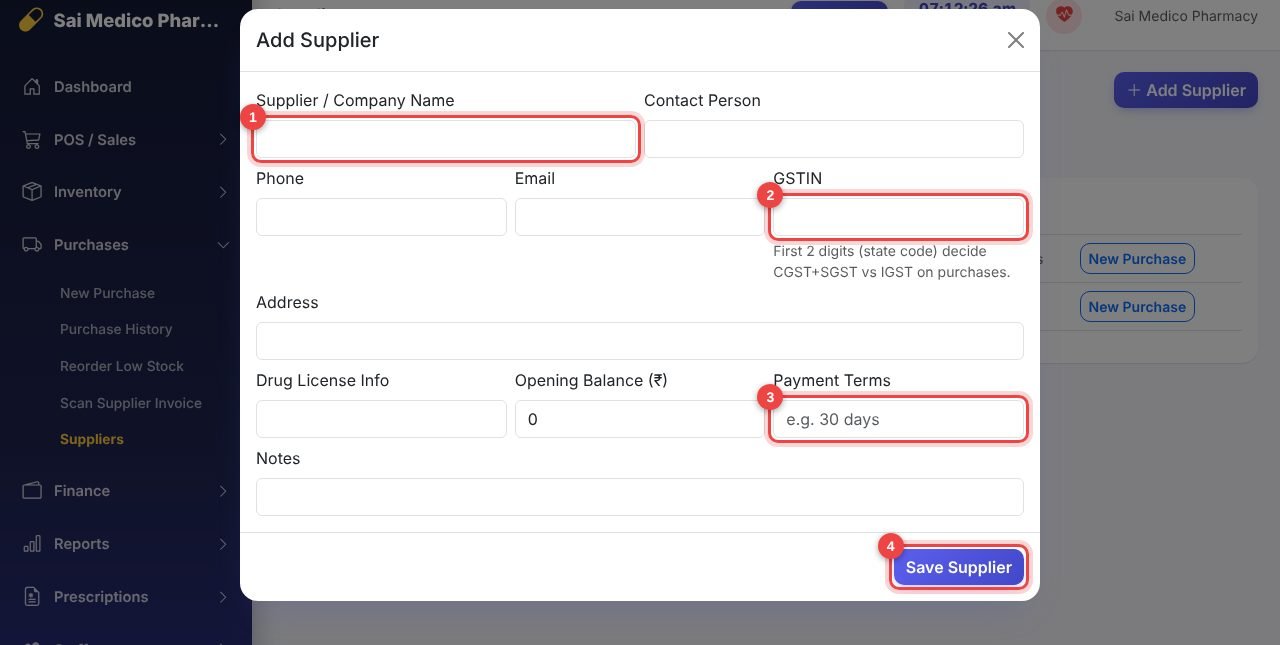
- 1Supplier / company nameSupplier / company ka naam
- 2GSTINGSTIN
- 3Payment terms (credit days)Payment terms (udhaar ke din)
- 4Save SupplierSave Supplier
Step 3 · Add medicinesStep 3 · Medicine jodein
Each medicine is added once with its price and GST. Stock (batches and expiry) is added later through purchases. Many medicines? Use Inventory → Import to upload an Excel/CSV list in one go.Har medicine ek baar price aur GST ke saath add hoti hai. Stock (batch aur expiry) baad mein purchase se aata hai. Bahut saari medicines hain? Inventory → Import se Excel/CSV list ek saath upload karein.
Open the formForm kholein
Go to Inventory → Medicines → Add Medicine.Inventory → Medicines → Add Medicine par jayein.
Fill the important fieldsZaroori fields bharein
Type the name, HSN code and GST rate (most medicines are 5% or 12%). Enter MRP and your selling price. Set the Schedule (H, H1, X) for prescription drugs. Click Add Medicine.Naam, HSN code aur GST rate daalein (zyada tar medicines 5% ya 12% hoti hain). MRP aur selling price daalein. Prescription wali dawaon ke liye Schedule (H, H1, X) bharein. Phir Add Medicine dabayein.
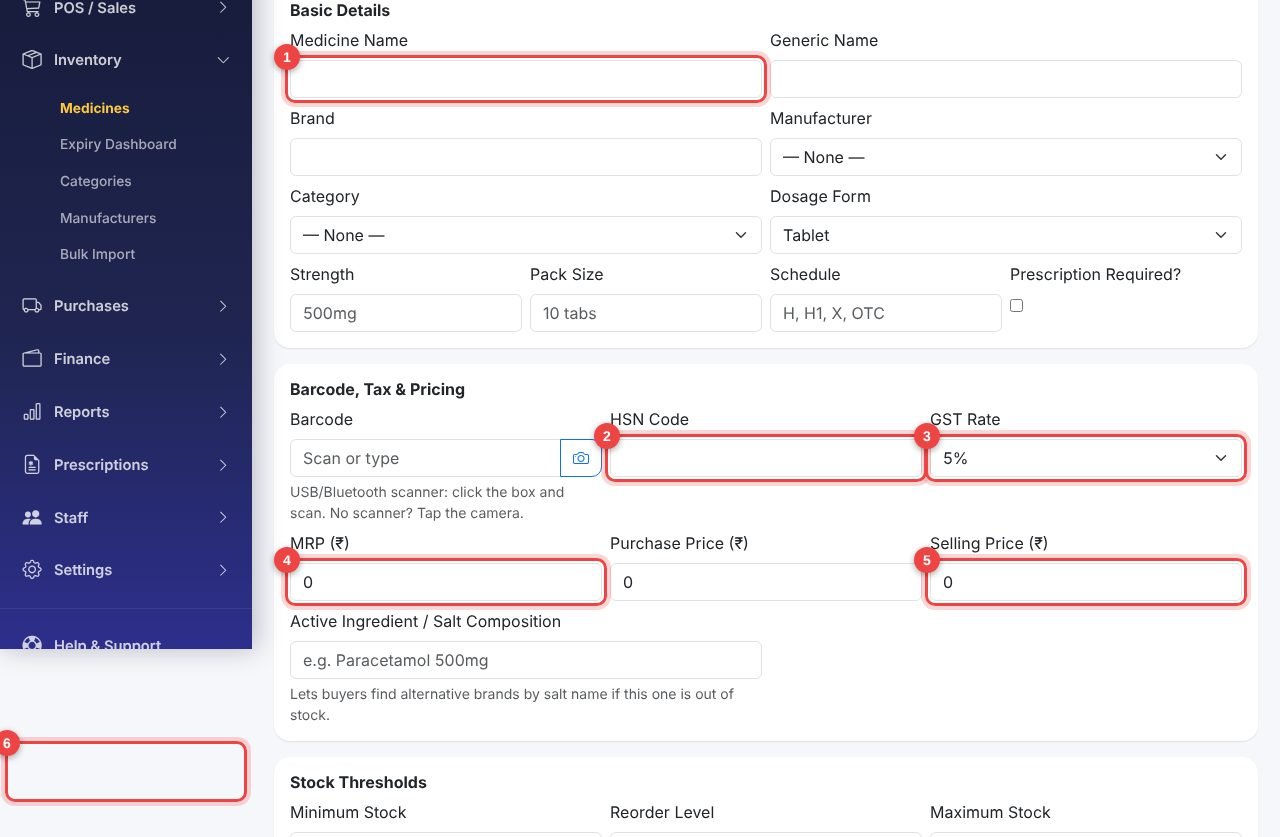
- 1Medicine nameMedicine ka naam
- 2HSN codeHSN code
- 3GST rateGST rate
- 4MRPMRP
- 5Selling priceSelling price
- 6Add Medicine (save)Add Medicine (save)
Step 4 · Add stock (purchase entry)Step 4 · Stock add karein (purchase entry)
Stock enters the shop through a purchase. Each line records the batch number, expiry date, quantity and rate, so the app can sell the earliest-expiry batch first.Stock purchase ke through dukaan mein aata hai. Har line mein batch number, expiry date, quantity aur rate likhe jaate hain, taaki app sabse pehle expire hone wala batch bechne de.
Option A: type the purchaseOption A: purchase khud likhein
Go to Purchases → New Purchase. Choose the supplier, enter the supplier's invoice number and date, then add item rows (medicine, batch, expiry, quantity, rate). Save.Purchases → New Purchase par jayein. Supplier chunein, supplier ka invoice number aur date daalein, phir item rows (medicine, batch, expiry, quantity, rate) jodein. Save karein.
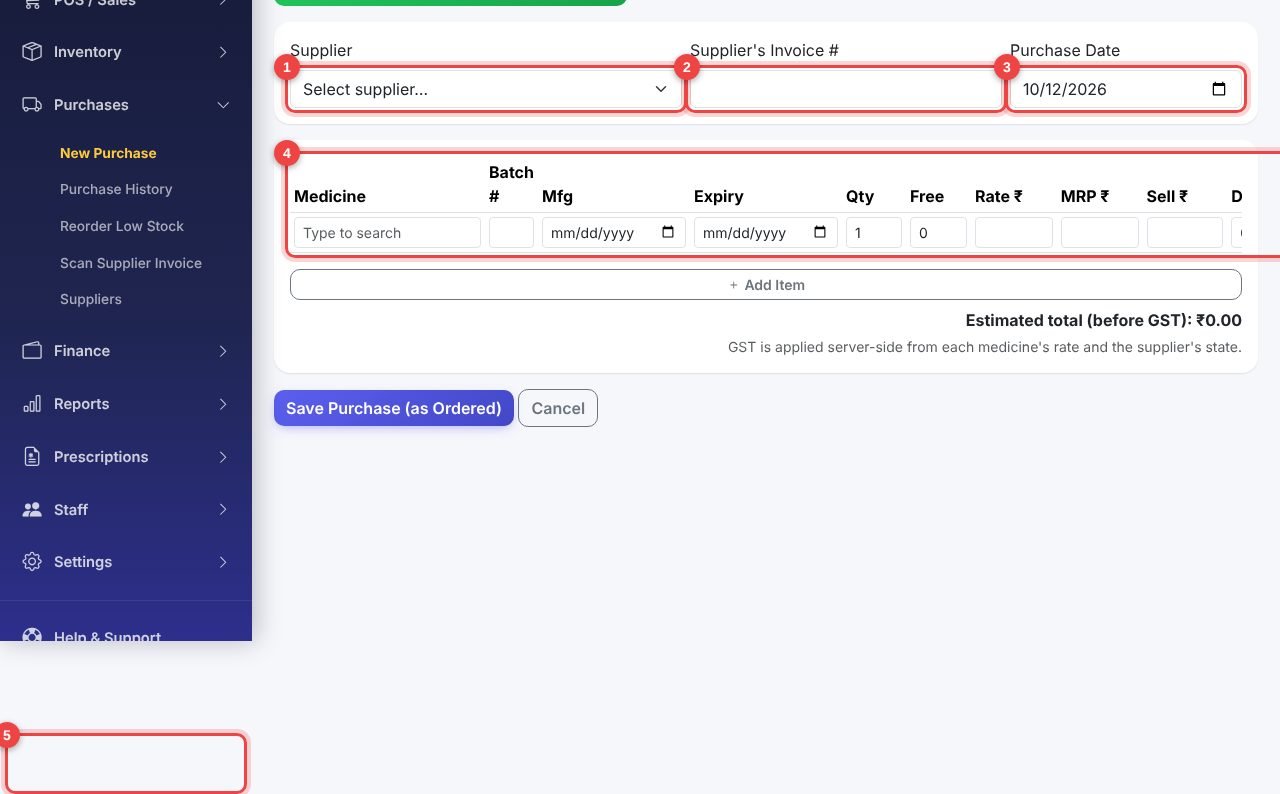
- 1SupplierSupplier
- 2Supplier's invoice numberSupplier ka invoice number
- 3Purchase datePurchase ki date
- 4Item rows: medicine, batch, expiry, qty, rateItem rows: medicine, batch, expiry, qty, rate
- 5Save PurchaseSave Purchase
Option B: scan the supplier invoice (fastest)Option B: supplier invoice scan karein (sabse tez)
Go to Purchases → Scan Supplier Invoice. Upload the invoice PDF or a clear photo and click Read invoice. The items are filled in for you. Check every line, then save.Purchases → Scan Supplier Invoice par jayein. Invoice ka PDF ya saaf photo upload karein aur Read invoice dabayein. Items apne aap bhar jaate hain. Har line check karke save karein.
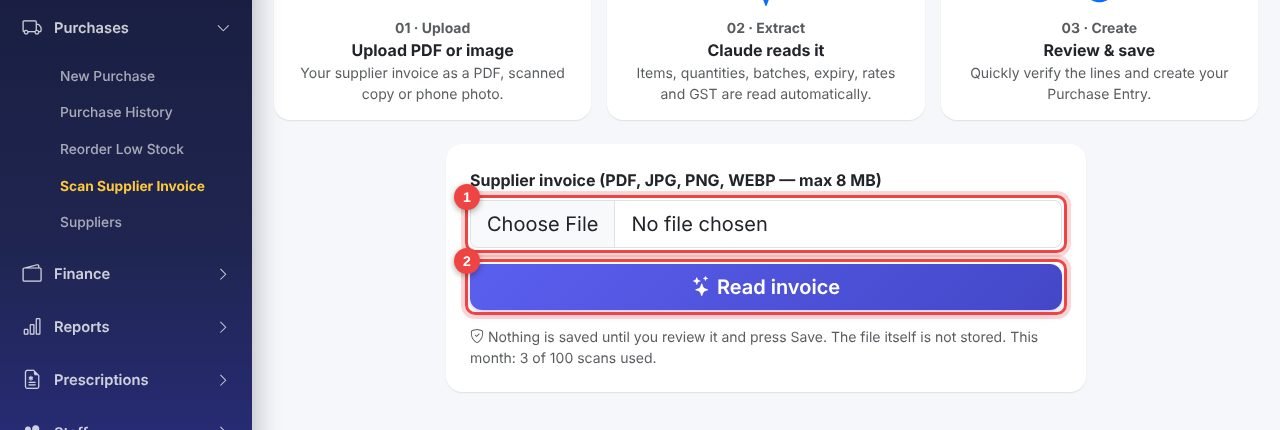
- 1Choose the invoice file (PDF or photo)Invoice file chunein (PDF ya photo)
- 2Read invoiceRead invoice
Step 5 · Make your first billStep 5 · Pehla bill banayein
Go to POS / Sales → New Sale. Keyboard shortcuts: F3 search, F4 customer, F8 hold, F9 complete.POS / Sales → New Sale par jayein. Keyboard shortcut: F3 search, F4 customer, F8 hold, F9 complete.
Add items and take paymentItems jodein aur payment lein
Optionally pick a customer (leave blank for a walk-in). Scan the barcode or type the medicine name and click it to add to the cart. Choose how the customer paid (Cash, Card or UPI), then click Complete Sale.Chahein to customer chunein (walk-in ke liye khali chhodein). Barcode scan karein ya medicine ka naam likhkar click karein, wo cart mein aa jayegi. Customer ne kaise pay kiya chunein (Cash, Card ya UPI), phir Complete Sale dabayein.
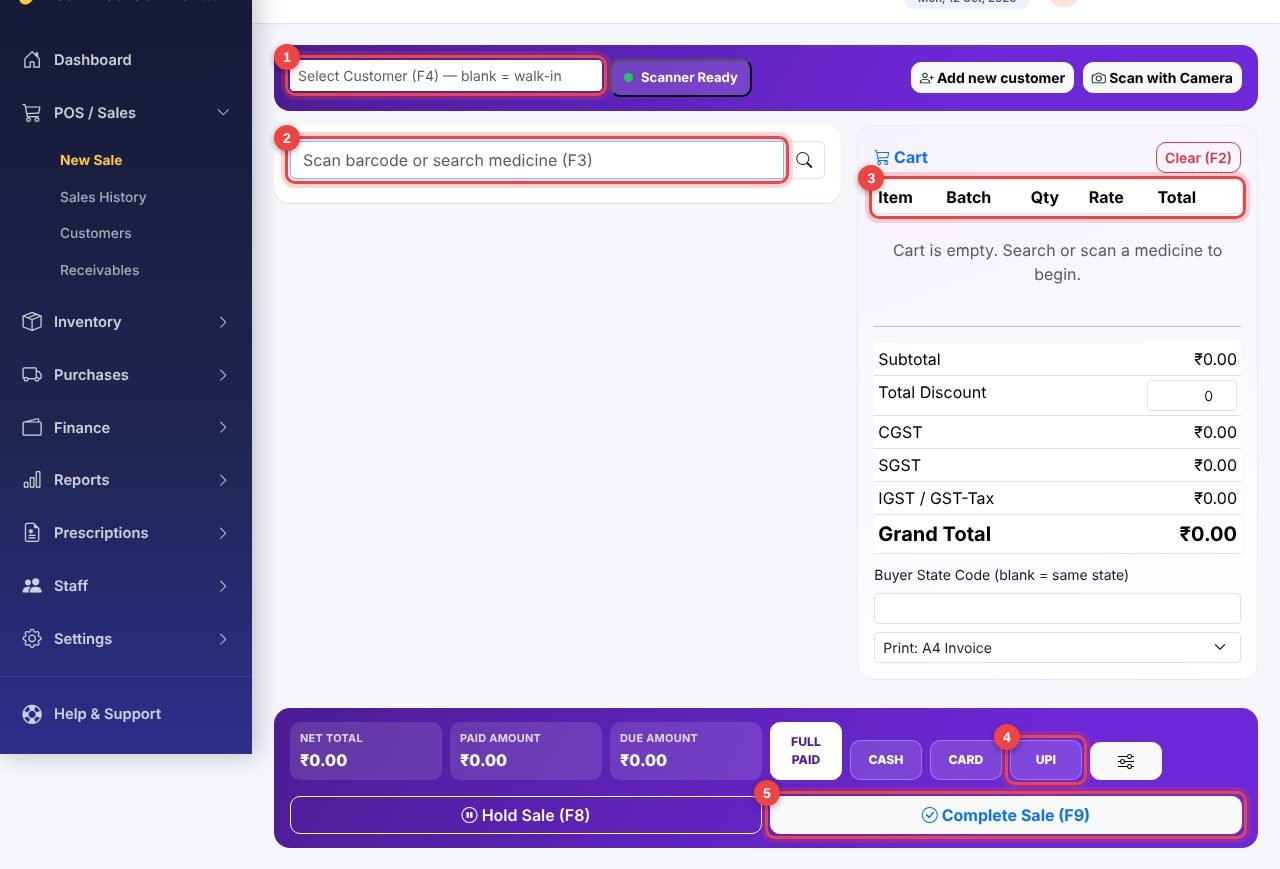
- 1Customer (optional)Customer (optional)
- 2Search box — scan or type the medicineSearch box — medicine scan ya type karein
- 3CartCart
- 4Payment methodPayment ka tareeka
- 5Complete SaleComplete Sale
Print options on the billBill par print options
The bill opens ready to print. At the top you can switch the bill format, and choose Cash, UPI QR or Bank details to show on this bill. Wholesale bills also have transport, vehicle and e-way bill fields. Click Print / Save PDF.Bill print ke liye khulta hai. Upar se bill format badal sakte hain, aur is bill par Cash, UPI QR ya Bank details dikhana chunein. Wholesale bill mein transport, vehicle aur e-way bill ke fields bhi hote hain. Phir Print / Save PDF dabayein.
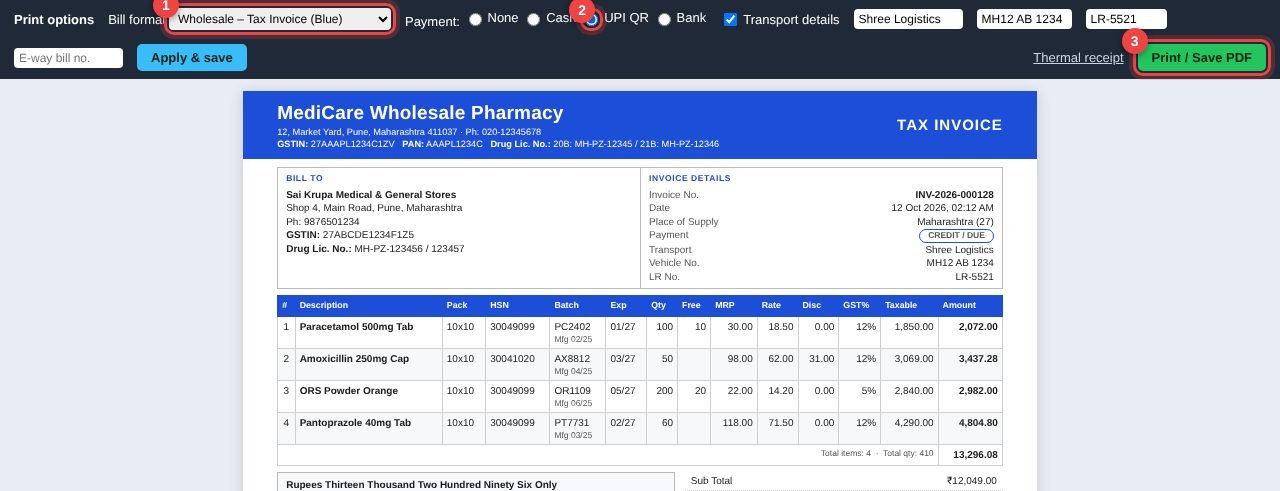
- 1Bill formatBill format
- 2Payment shown on this bill (UPI QR here)Is bill par dikhne wala payment (yahan UPI QR)
- 3Print / Save PDFPrint / Save PDF
Customers, credit and remindersCustomers, udhaar aur reminder
Customers (or retailer parties if you are a wholesaler) let you sell on credit and see their full history.Customers (wholesaler ke liye retailer parties) se aap udhaar de sakte hain aur unki poori history dekh sakte hain.
Add a customerCustomer jodein
Go to POS / Sales → Customers and fill in the form on the right. Wholesalers also add GSTIN, drug licence number and credit limit here.POS / Sales → Customers par jayein aur right side ka form bharein. Wholesaler yahin GSTIN, drug licence number aur credit limit bhi daalte hain.
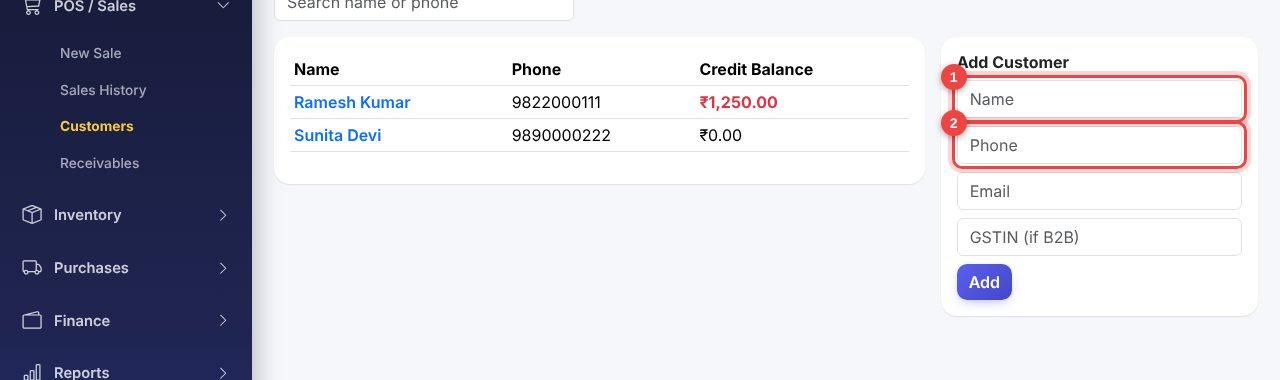
- 1NameNaam
- 2PhonePhone
Account statement and WhatsApp reminderAccount statement aur WhatsApp reminder
Open a customer with dues and click Statement (or Remind on the Receivables page). You get a printable statement and a one-click WhatsApp payment reminder.Baaki wale customer ko kholein aur Statement dabayein (ya Receivables page par Remind). Aapko printable statement aur ek click ka WhatsApp payment reminder milta hai.
Bill design and digital signatureBill design aur digital signature
Go to Settings → Invoice Designer. Every bill is a professional A4 page.Settings → Invoice Designer par jayein. Har bill professional A4 page hota hai.
Choose bill formatsBill format chunein
Pick a format for normal customer bills and another for wholesale (tax-invoice) bills. Choose what the bill shows by default for payment, and use the switches to show or hide the QR code, signature and transport details. Click Save Invoice Design.Normal customer bill ke liye ek format aur wholesale (tax-invoice) bill ke liye doosra chunein. Payment ke liye default kya dikhe wo chunein, aur switches se QR code, signature aur transport details dikhayein ya chhupayein. Phir Save Invoice Design dabayein.
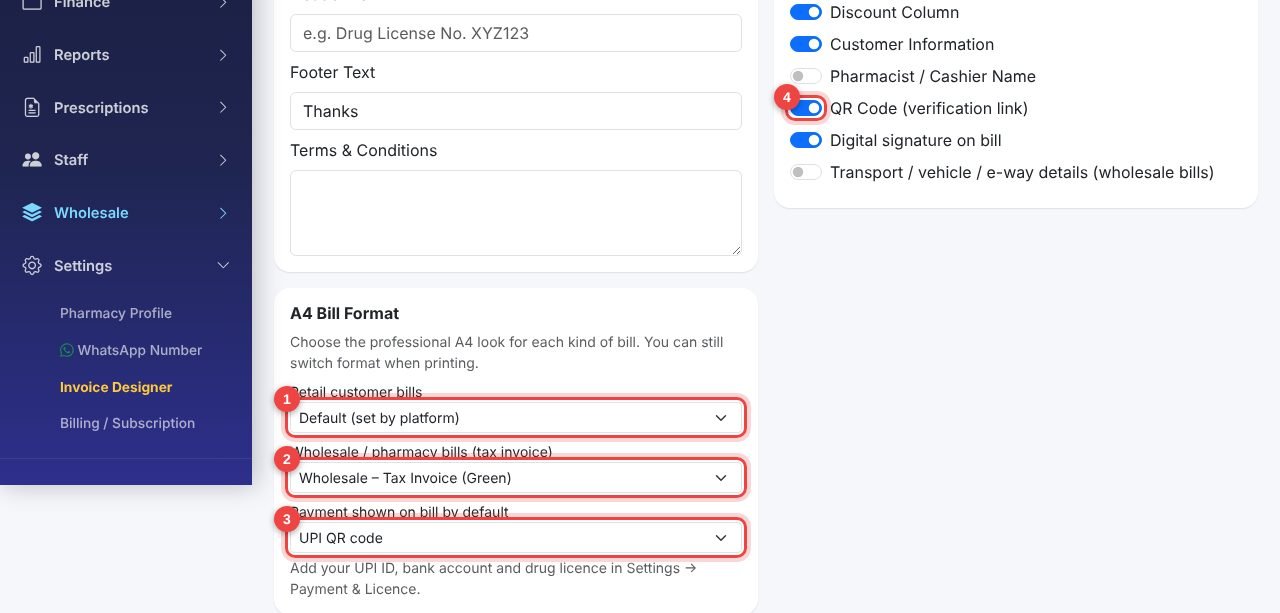
- 1Format for customer billsCustomer bill ka format
- 2Format for wholesale billsWholesale bill ka format
- 3Default payment shown on billsBill par default payment
- 4QR code switch (online invoice link)QR code switch (online invoice link)
Add your signature onceSignature ek baar lagayein
Draw your signature in the box with your finger or mouse, or upload a PNG, then click Save signature. It prints above "Authorised Signatory". Turn the Digital signature on bill switch off any time to hide it.Box mein ungli ya mouse se signature banayein, ya PNG upload karein, phir Save signature dabayein. Yeh "Authorised Signatory" ke upar chhapta hai. Chhupane ke liye kabhi bhi Digital signature on bill switch band kar dein.
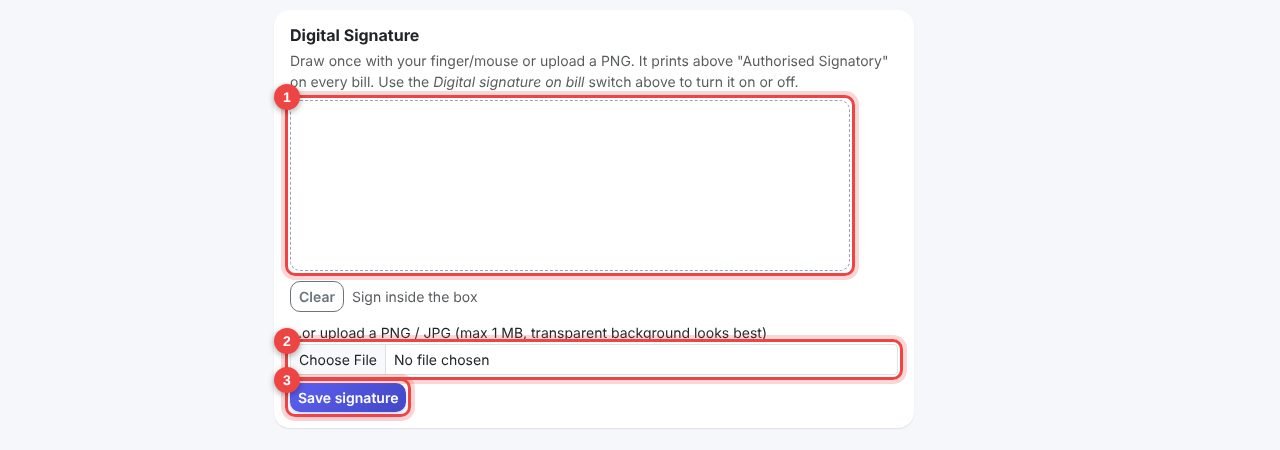
- 1Draw your signature hereYahan signature banayein
- 2…or upload an image…ya image upload karein
- 3Save signatureSave signature
Send bills on WhatsAppWhatsApp par bill bhejein
Bills are sent from your own WhatsApp Business number. Go to Settings → WhatsApp Number.Bill aapke apne WhatsApp Business number se jaate hain. Settings → WhatsApp Number par jayein.
Connect your numberApna number jodein
Create a free WhatsApp Business API app in Meta Business, copy the Phone Number ID and Access Token, paste them here and save. Until you do this, WhatsApp sending stays off (you can still print or share the bill link).Meta Business mein free WhatsApp Business API app banayein, Phone Number ID aur Access Token copy karke yahan paste karein aur save karein. Jab tak yeh nahi karte, WhatsApp bhejna band rahta hai (bill print ya link share phir bhi kar sakte hain).
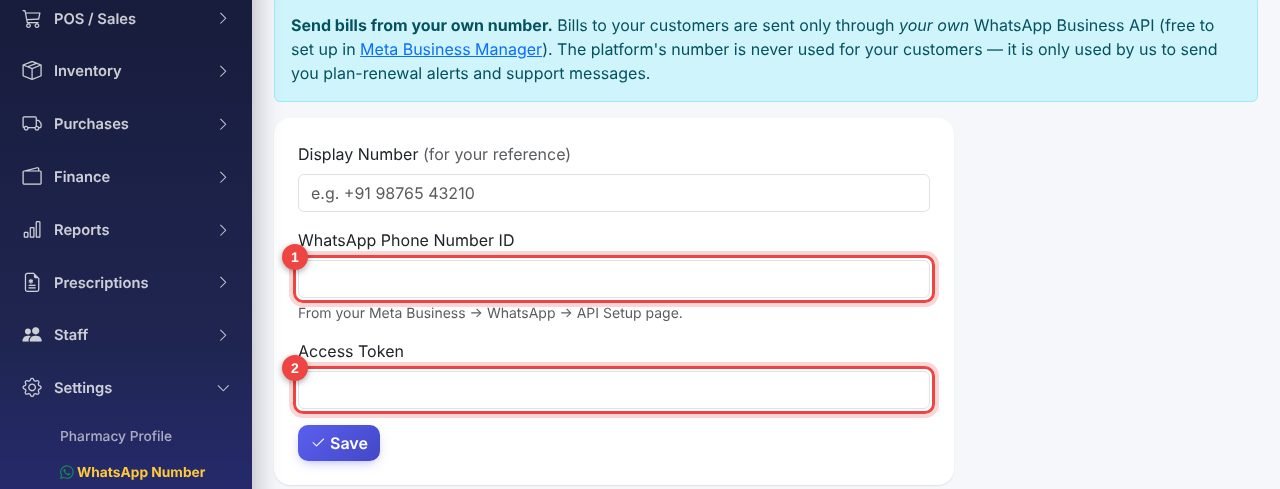
- 1Phone Number IDPhone Number ID
- 2Access TokenAccess Token
Back up your dataApna data backup karein
Download your own copy of the data whenever you like — for example every week.Jab chahein apne data ki apni copy download karein — jaise har hafte.
Download a backupBackup download karein
Go to Settings → Pharmacy Profile and scroll to Backup your data. Full backup gives a ZIP of Excel-ready files (medicines, batches, sales, purchases, customers…). Stock only gives just your current stock sheet. Passwords are never included.Settings → Pharmacy Profile par jakar Backup your data tak scroll karein. Full backup se Excel-ready files ka ZIP milta hai (medicines, batches, sales, purchases, customers…). Stock only sirf aapki current stock sheet deta hai. Password kabhi shamil nahi hote.
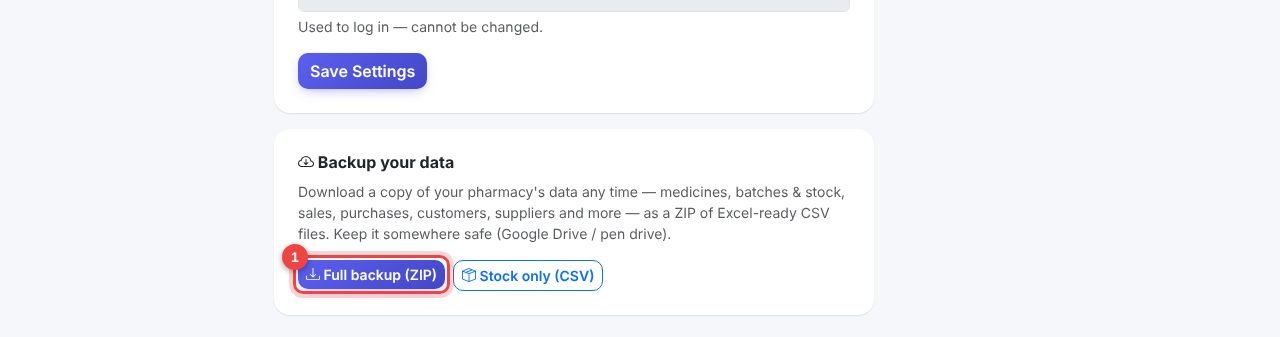
- 1Full backup / Stock only buttonsFull backup / Stock only buttons
Health reminders for youAapki sehat ke reminder
Sitting at the counter all day is hard on the eyes, back and body. The heart button in the top bar gives gentle reminders.Poora din counter par baithna aankhon, peeth aur sharir ke liye mushkil hai. Upar bar ka heart button halke reminders deta hai.
What you getAapko kya milta hai
Reminders to rest your eyes (every 20 min), drink water (45 min), stretch (60 min) and walk (2 hours). Choose which ones you want, see today's counts, or start a 1-minute calm breathing exercise. Reminders never pop up while you are billing. Settings are saved on that computer.Aankhon ko aaram (har 20 min), paani peene (45 min), stretch (60 min) aur walk (2 ghante) ke reminder. Jo chahein wo chunein, aaj ki ginti dekhein, ya 1 minute ka calm breathing shuru karein. Billing ke dauraan reminder kabhi nahi aate. Settings usi computer par save rehti hain.
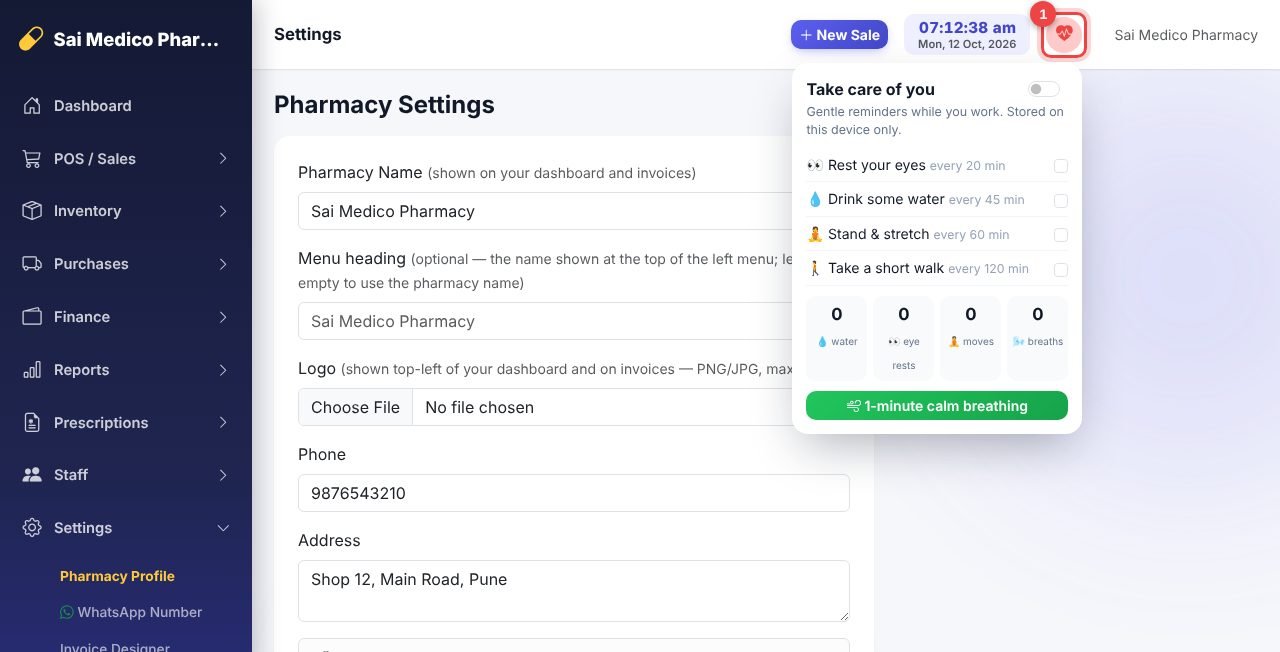
- 1Heart button — click to open the reminder settingsHeart button — reminder settings kholne ke liye click karein
Reports and complianceReports aur compliance
Open the Reports menu for everything your CA and the Drug Inspector may ask for.Reports menu mein woh sab hai jo aapke CA aur Drug Inspector maang sakte hain.
Useful reportsKaam ke reports
Tax / GST Report: HSN-wise summary with CSV export. Schedule H1/X Register: every H1/X/NDPS drug sold, with patient and doctor (link the prescription to the sale). Reorder & Dead Stock: what to order now, and what has not sold for months. Profit, Sales, Purchase and Inventory reports are there too.Tax / GST Report: HSN-wise summary, CSV export ke saath. Schedule H1/X Register: bechi gayi har H1/X/NDPS dawa, patient aur doctor ke saath (prescription ko sale se link karein). Reorder & Dead Stock: abhi kya mangwana hai, aur kaun si dawa mahino se nahi bik rahi. Profit, Sales, Purchase aur Inventory reports bhi hain.
Common questionsAam sawaal
Log in and open Help & Support to raise a ticket.Login karke Help & Support se ticket banayein.